Setup guide for AutoArticle Generator
AutoArticle Generator integrates your AutoArticle.net account with HubSpot, which lets users:
- Automatically generate high-quality, AI-powered blog posts and publish them directly to your HubSpot blog.
- Schedule recurring article creation to keep your HubSpot blog consistently updated with fresh, relevant content.
Install the app
To connect your HubSpot account to AutoArticle Generator, follow these steps:
- Log in to your AutoArticle.net account. If you don't have one, you can sign up for $9/month (first month free) on our Membership Levels page.
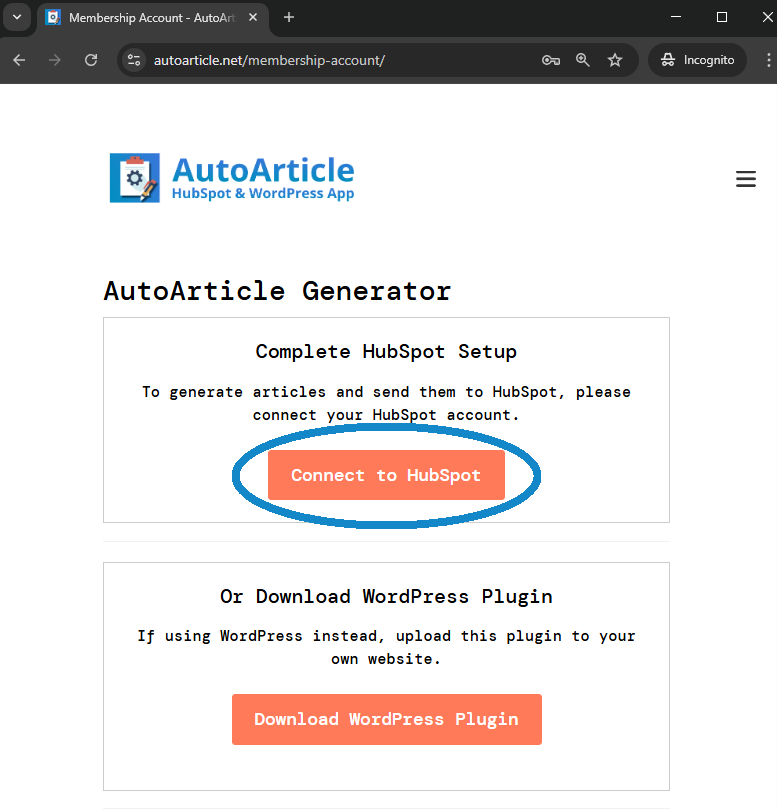
- Navigate to your Account Page.
- Click the Connect to HubSpot button.
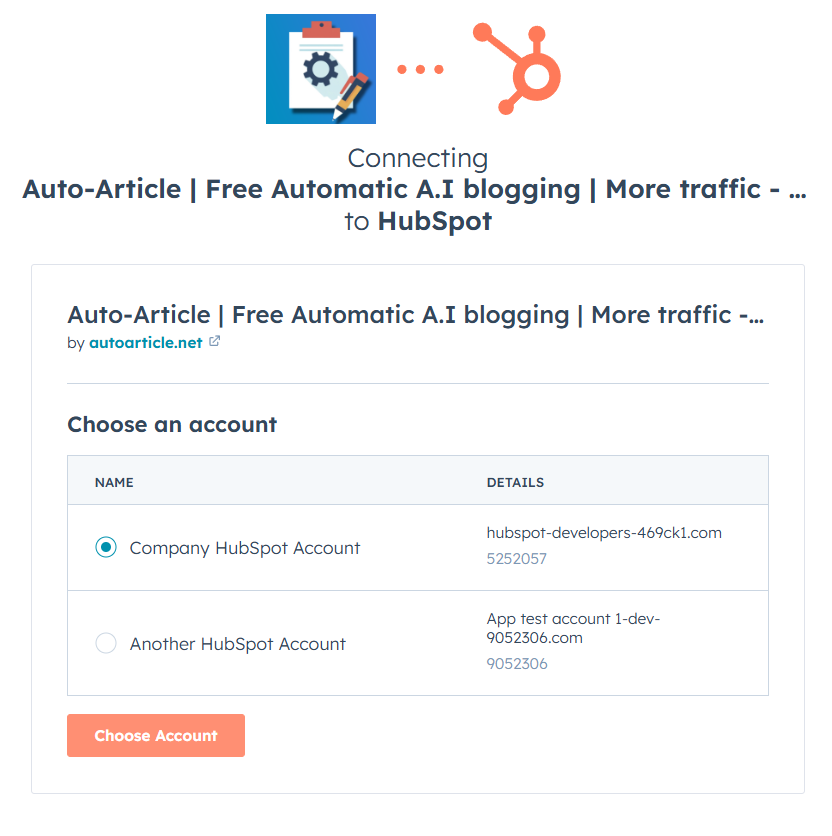
- You will be redirected to HubSpot. If prompted, log in to your HubSpot account and select the account you wish to connect.
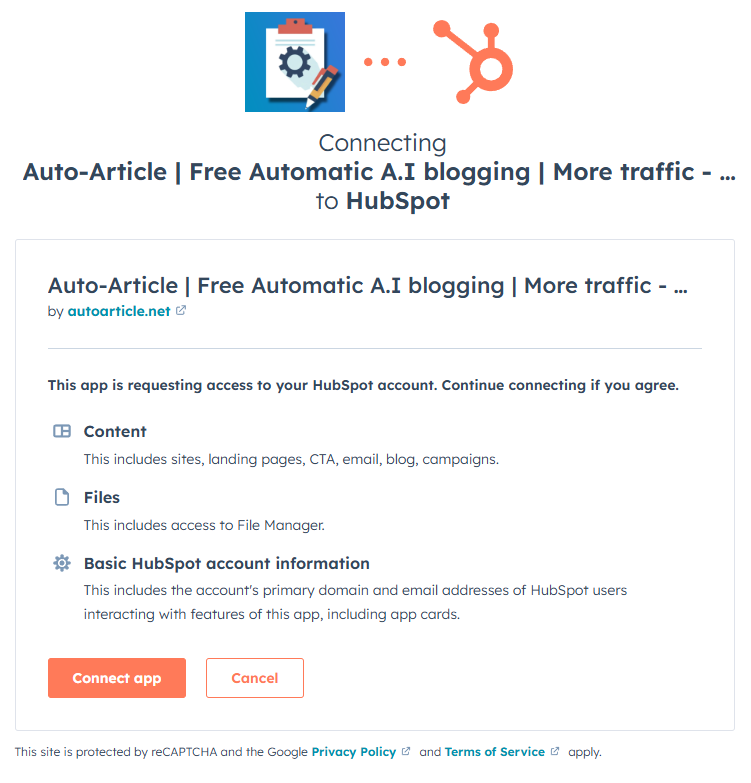
- Review the permissions requested by the app. AutoArticle Generator requires the
content, oauth, and files permissions to create blog posts, manage authorization, and upload generated images to your HubSpot File Manager.
- Click Connect app.
- After successful authorization, you will be redirected back to your AutoArticle.net account page, where you can configure the integration.
Configure the app
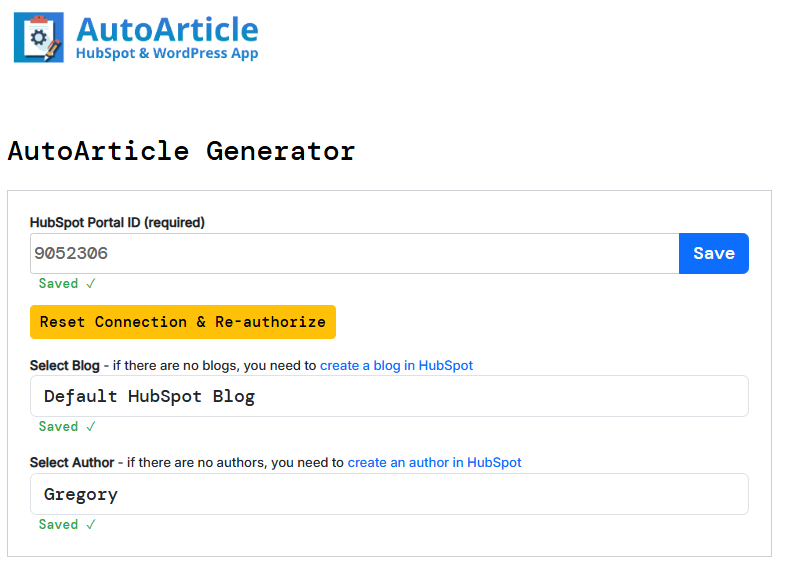
Once your account is connected, you need to select a blog and author for your articles.
- On your AutoArticle.net Account Page, you will now see the HubSpot Settings section.
- From the Select Blog dropdown, choose the HubSpot blog you want to publish articles to. If the list is empty, you must first create a blog in your HubSpot account.
- From the Select Author dropdown, choose the author for the generated articles. If the list is empty, you must first create a blog author in your HubSpot account.
- Once a blog and author are selected and saved, the main article generation form will become available. Here you can define your article topics, writing style, image preferences, and language.
Use the app
You can generate articles manually or set up a schedule for automated posting.
Manual Generation
- Enter your desired topics, writing style, image style, and other preferences in the article generation form.
- Click the Generate Now button.
- A modal will appear asking you to confirm the topic for this specific article. You can select from your list or enter a custom one-time topic.
- Click Generate Article. The system will create the content and automatically push it to your selected HubSpot blog. The post will be created as a Draft unless you have changed the default setting.
Scheduled Generation
- In the Set a Schedule section, select a frequency (e.g., Daily, Weekly, Monthly) and a time of day for generation.
- The system will automatically pick a topic from your saved list, generate a new article, and push it to your HubSpot blog according to your schedule.
Disconnect the app
Note: Disconnecting your HubSpot account will prevent AutoArticle.net from creating new posts in your HubSpot blog. Any articles already created will not be affected. Your scheduled jobs will no longer send articles to HubSpot.
- Log in to your AutoArticle.net account.
- Navigate to your Account Page.
- In the HubSpot Settings section, click the Reset Connection & Re-authorize button.
- A confirmation prompt will appear. Confirm that you wish to disconnect. This will securely remove your HubSpot connection details from our system.
Uninstall the app
To completely uninstall the AutoArticle Generator app from your HubSpot account, please follow the instructions in this HubSpot Knowledge Base article.